There are a few methods to perform a backup of your Check Point system running Gaia OS. They differ by size, time of creation and content. Here, we are going to explore of all available backup methods and recommendation for configuring effective backup scheme.
The built-in Gaia backup procedures:
- Snapshot Management
- System Backup (and System Restore)
- Save/Show Configuration (and Load Configuration)
All methods can be used to back up your Security Gateways, Security Management and Multi-Domain Server.
Please note: All methods are appliance-specific and can only be restored on the same model of appliance.
- Snapshot Management: Snapshot is the best way to restore your entire configuration however it is very extensive in size and took more CPU and memory to create and restore snapshot.
The snapshot creates a binary image of the entire root (lv_current) disk partition. This includes Check Point products, configuration, and operating system.
Starting in R77.10, exporting an image from one machine and importing that image on another machine of the same type is supported.
The log partition is not included in the snapshot. Therefore, any locally stored Firewall logs will not be saved.
2. System Backup (and System Restore): System Backup can be used to backup current system configuration. A backup creates a compressed file that contains the Check Point configuration including the networking and operating system parameters, such as routing and interface configuration etc., but unlike a snapshot, it does not include the operating system, product binaries, and hotfixes.
3. Save/Show Configuration (and Load Configuration): Allows saving Gaia OS configuration settings as a ready-to-run CLI script. This allows you review your current setup and quickly restore the Gaia OS configuration.
Recommended backup plan
For complete backup of the system and maximum confidence, Check Points recommends combining all three methods as part of the backup plan (Snapshot Management, System Backup/Restore, and Save/Load Configuration). This will allow multiple restore points, redundancy and reliability of overall restore procedure.
Collect:
Snapshot – after a fresh installation, before an upgrade, and before a hotfix installation.
Scheduled Backup – monthly or weekly, depending how frequently you perform changes in your configuration and policy.
Recommended steps in case of Disaster Recovery
- Revert to a Snapshot – restores the Check Point version with all the setup details, including type (management/gateway) and installation of hotfixes.
- Restore from Backup – restores latest system configuration with all recent network and security configuration.
- Compare the output of Clish command “show configuration” to the saved configuration to verify that Gaia OS configuration was restored properly.
- Install policy on this machine (if it is a Security Gateway / Standalone).
How to configure Backup in Gaia platform:
Backing Up and Restoring – Gaia Portal (GUI)
To create a backup (Gaia Portal)
- In the tree view, click Maintenance > System Backup.
- Click Add Backup.
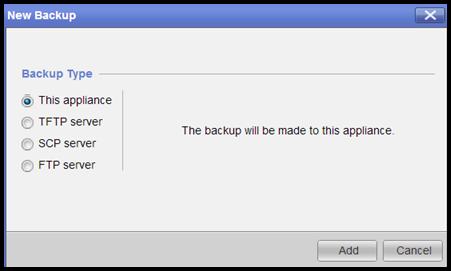
The New Backup window opens. - Select the location of the backup file:
- This appliance
- TFTP server. Specify the IP address.
- SCP server. Specify the IP address, user name and password.
- FTP server. Specify the IP address, user name and password.
To restore from a backup (Gaia Portal)
- Before restoring from backup, machine need to be configured with previous hostname. Otherwise, double reboot is needed post the restore to make the machine active.
- In the tree view, click Maintenance > System Backup.
- Select the backup file and click Restore Backup.
- A pop up messages indicates a restore is in progress until it is done.
- Reboot the machine once restore is done.
- Install policy.

Backing Up and Restoring – in Clish
To create a backup (Clish)
Commands:
Use one of the following commands, depending on the backup type:
- To save a backup locally:
- add backup local
- To save a backup on a remote server using FTP:
- add backup ftp ip VALUE path /some/path/ username VALUE password plain
- To save a backup on a remote server using TFTP:
- add backup tftp ip VALUE
- To save a backup on a remote server using SCP:
- add backup scp ip VALUE path /some/path/ username VALUE password plain
Command Parameters:
- ip VALUE – The IP address of the remote server.
- username VALUE – User name required to log in to the remote server.
- password plain – At the prompt, enter the password for the remote server.
- /some/path/ – Path to stored backup on FTP server
Example:
HostName> add backup localCreating backup package. Use the command ‘show backup status’ to monitor creation progress.
Notes:
- Backup configurations on Check Point appliances are stored in /var/log/CPbackup/backups/
Backup configurations on Open Servers are stored in /var/CPbackup/backups/
To restore from a backup (Clish)
Steps Required:
- Run the appropriate restore command (see Commands below).
- Monitor progress (see section “(2-C) Monitoring Backup and Restore Status” below).
- Once operation is done reboot the machine.
- Install policy.
Commands:
Use one of the following commands, depending on the backup type.
- To restore a local backup:
- set backup restore local <TAB>
- To restore a backup from a remote server using FTP:
- set backup restore ftp ip VALUE path /some/path file VALUE username VALUE password plain
- To restore a backup from a remote server using TFTP:
- set backup restore tftp ip VALUE file VALUE
- To restore a backup from a remote server using SCP:
- set backup restore scp ip VALUE path /some/path file VALUE username VALUE password plain
Command Parameters:
- local <TAB> – The <TAB> does an auto-complete on the name and location of the backup file.
- ip VALUE – The IP address of the remote server.
- username VALUE – User name required to log in to the remote server.
- password plain – At the prompt, enter the password for the remote server.
- /some/path – Path to stored backup.
Example:
HostName> set backup restore local backup_gaiaGW_21_1_2013_09_52.tgzRestoring from backup package. Use the command ‘show backup status’ to monitor restoring progress.Please reboot the machine when it’s finished.
Important: Once restore is done, you must reboot and install policy in order to apply the new configuration.
Monitoring Backup and Restore Status (Clish)
- To show a list of local backups:
- show backups
Configuring Scheduled Backups – in Clish
To add a scheduled backup (Clish)
Commands:
- Use one of the following commands to create the backup task, depending on the backup type:
- To add a scheduled backup locally:
- add backup-scheduled name VALUE local
- To add a scheduled backup on a remote server using FTP:
- add backup-scheduled name VALUE ftp ip VALUE path /some/path/ username VALUE password plain
- To add a scheduled backup on a remote server using SCP:
- add backup-scheduled name VALUE scp ip VALUE path /some/path/ username VALUE password plain
- To add a scheduled backup on a remote server using TFTP:
- add backup-scheduled name VALUE tftp ip VALUE
- Next, use one of the following commands to schedule the backup task:
- To configure a daily backup schedule:
- set backup-scheduled name VALUE recurrence daily time VALUE
- To configure a monthly backup schedule:
- set backup-scheduled name VALUE recurrence monthly month VALUE days VALUE time VALUE
- To configure a weekly backup schedule:
- set backup-scheduled name VALUE recurrence weekly days VALUE time VALUE
Example:
HostName> add backup-scheduled name TuesThursBackup localThe backup name and type has been set.The backup is not yet scheduled.Please use the command ‘set backup-scheduled name…’ in order to schedule the backup. HostName> set backup-scheduled name TuesThursBackup recurrence weekly days 2,4 time 18:00Backup was successfully scheduled.
Notes:
To configure monthly or weekly backups, days and months need to be converted to numerical format. For example: Monday becomes 1, Tuesday becomes 2, September becomes 9 and so forth.
How to create Snapshot and restore it:
Configuring Snapshot Management – Gaia Portal
Before you create a snapshot image, make sure the storage computer or appliance fulfills the prerequisites.
To create a snapshot:
1. In the tree view, click Maintenance > Image Management.
2. Below available images, click New Image. The Create New Image window opens.
3. In the Name field, enter a name for the image.
4. Optional: In the Description field, enter a description for the image.
5. Click OK.
To restore a snapshot:
1. In the tree view, click Maintenance > Image Management.
2. Select an image.
3. Click Revert. The Revert window opens.
Note – Pay close attention to the warnings about overwriting settings, the credentials, and the reboot and the image details.
4. Click OK.
To delete a snapshot:
1. In the tree view, click Maintenance > Image Management.
2. Select an image.
3. Click Delete. The Delete Image window opens.
4. Click Ok.
To export a snapshot:
1. Make sure that there is enough disk space in: /var/log
2. In the tree view, click Maintenance > Image Management.
3. Select an image.
4. Click Export. The Export Image (name) window.
5. Click Start Export.
To import an image:
1. In the tree view, click Maintenance > Image Management.
2. Select an image.
3. Click Import. The Import Image window opens.
4. Click Browse to select the import file for upload.
5. Click Upload.
6. Click OK.
Note – You must not rename the exported image. If you rename a snapshot image, it is not possible to revert to it.
Configuring Snapshot Management – Gaia Clish (snapshot)
Description: Manage system images (also known as snapshots)
To make a new image:
add snapshot VALUE desc VALUE
To delete an image
delete snapshot VALUE
To export or import an image, or to revert to an image:
set snapshot export VALUE path VALUE name VALUE
set snapshot import VALUE path VALUE name VALUE
set snapshot revert VALUE
To show image information
show snapshot VALUE all
show snapshot VALUE date
show snapshot VALUE desc
show snapshot VALUE size
show snapshots
Comments:
- To create the snapshot image requires free space on the Backup partition. The required free disk space is the actual size of the root partition, multiplied by 1.15.
- The available space required in the export file storage location is the size of the snapshot multiplied by two.
- The minimum size of a snapshot is 2.5G. Therefore, the minimum available space necessary in the export file storage location is 5G.
- You must not rename the exported image. If you rename a snapshot image, it is not possible to revert to it
Factory default images are created automatically when you install or upgrade an appliance to another release. You can restore your Check Point appliance to the factory default image for a specified release.
Note – This procedure overwrites all current configuration settings. We recommend that you create a backup image before you restore a factory default image.
Move or download snapshot file from device to local system:
On Gaia and Check Point Appliances running SecurePlatform all snapshots are stored as Logical Volume Management (LVM) volumes.
Note: On Gaia OS, snapshots are not files, but a disk volumes that are stored as a disk partition, therefore the directory name is not relevant here. It is possible to view list of virtual drives by running the “lvs” command (in Expert mode).
- Every snapshot is a zipped .tar file named according to the pattern:
snapshot_<creation date>_<creation time>.tgz
Logs generated during the snapshot creation, are stored at /var/CPsnapshot/log/snapshots/ directory.
Snapshot download from the Logical Volume Management (LVM)
In Gaia, snapshot can be downloaded with from WebUI or Clish
In Clish:
- Export existing snapshot:> set snapshot export <snapshot_name> path <path_to_store>
- Export and rename snapshot:# set snapshot export <snapshot_name> path <path_to_store> name <exported_name>
After this you can copy the .tar file from the machine.
In WebUI:
- In the Navigation tree on the left, go to Snapshot Management
- Select the snapshot
- Click Export
- Click Start Export:

How to take configuration backup from CLI:
Login to Device -> Go to Clish -> tybe below command to get current configuration
>Show config
You can copy all output from cland it can be restore after reset device.

Leave a Reply