TLS and SSL Background
TLS is the new standard for socket layer security, proceeding SSL. TLS offers better encryption standards with other security and protocol wrapper features advancing SSL. Often, the terms TLS and SSL are used interchangeably. However, as a professional CentOS Administrator, it is important to note the differences and history separating each.
SSL goes up to version 3.0. SSL was developed and promoted as an industry standard under Netscape. After Netscape was purchased by AOL (an ISP popular in the 90’s otherwise known as America Online) AOL never really promoted the change needed for security improvements to SSL.
At version 3.1, SSL technology moved into the open systems standards and was changed to TLS. Since copyrights on SSL were still owned by AOL a new term was coined: TLS – Transport Layer Security. So, it is important to acknowledge that TLS is in fact different from SSL. Especially, as older SSL technologies have known security issues, and some are considered obsolete today.
Note − This tutorial will use the term TLS when speaking of technologies 3.1 and higher. Then SSL when commenting specific to SSL technologies 3.0 and lower.
SSL vs TLS Versioning
The following table shows how TLS and SSL versioning.
| TLS | SSL |
| – | 3.0 |
| 1.0 | 3.1 |
| 1.1 | 3.2 |
| 1.2 | 3.3 |
TLS performs two main functions important to the users of the Internet today: One, it verifies who a party is, known as authentication. Two, it offers end-to-end encryption at the transport layer for upper-level protocols that lack this native feature (ftp, http, email protocols, and more).
The first, verifies who a party is and is important to security as end-to-end encryption. If a consumer has an encrypted connection to a website that is not authorized to take payment, financial data is still at risk. This is what every phishing site will fail to have: a properly signed TLS certificate verifying website operators are who they claim to be from a trusted CA.
There are only two methods to get around not having a properly signed certificate: trick the user into allowing trust of a web-browser for a self-signed certificate or hope the user is not tech savvy and will not know the importance of a trusted Certificate Authority (or a CA).
In this tutorial, we will be using what is known as a self-signed certificate. This means, without explicitly giving this certificate the status of trusted in every web browser visiting the web-site, an error will be displayed discouraging the users from visiting the site. Then, it will make the user jump though a few actions before accessing a site with a self-signed certificate. Remember for the sake of security this is a good thing.
Install and Configure Openssl
openssl is the standard for open-source implementations of TLS. openssl is used on systems such as Linux, BSD distributions, OS X, and even supports Windows.
openssl is important, as it provides transport layer security and abstracts the detailed programming of Authentication and end-to-end encryption for a developer. This is why openssl is used with almost every single open-source application using TLS. It is also installed by default on every modern version of Linux.
We are using here Ubuntu Linux to demonstrate it.
When running the installer, it was found there was actually an update to openssl.

Create Self-signed Certificate for Apache Web Server
In this tutorial, we will assume Apache is already installed. We did install Apache in another tutorial ().
Once Apache can be installed using the following steps −
Step 1 − Install mod_ssl for Apache2 Server.
First we need to configure Apache with mod_ssl.
a2enmod ssl

Then reload your Apache daemon to ensure Apache uses the new configuration.
systemctl restart apache2
systemctl status apache2

At this point, Apache is configured to support TLS connections on the local host.
Step 2 − Create the self-signed ssl certificate.
First, let’s configure our private TLS key directory.
Note − Be sure only the root has read/write access to this directory. With world read/write access, your private key can be used to decrypt sniffed traffic.
Generating the certificate and key files. (Using root user)
openssl req -x509 -nodes -days 365 -newkey rsa:2048 -keyout /etc/ssl/private/self-gen-apache.key -out /etc/ssl/certs/self-sign-apache.crt
it will generate RSA 2048 private key. (recommended)

Enter the requested information to generate a SSL certificate.

Here is an explanation for each option we used with the openssl command −
| Command | Action |
| req -X509 | Use X.509 CSR management PKI standard for key management. |
| -nodes | Do not secure our certificate with a passphrase. Apache must be able to use the certificate without interruption of a passphrase. |
| -days 2555 | Tells the validity of the certificate to 7 years or 2555 days. Time period can be adjusted as needed. |
| -newkey rsa:2048 | Specified to generate both key and certificate using RSA at 2048 bits in length. |
Once certificate and key generated you can go and validate it in respective folders.
For cert:
cd /etc/ssl/certs

cat cert_filename

For key file:
cd /etc/ssl/private

Cat key_filename

Note: I have edited private key for security reasons.
Now we need to create a new virtual host for port 443 (HTTPS)
- Go to Apache2/sites-available folder.

There is a default ssl conf file is already configured. You can use the same or create new conf file for your website.
nano your_domain-ssl.conf

Note: Give correct path for SSL cert and Private key otherwise it won’t work correctly.
Validate it

cat your_domain-ssl.conf

We need to enable this conf file (virtual host) and disable the default ssl conf file
Enable conf file.
a2ensite your_domain-ssl.conf
a2ensite your_domain-ssl.conf

disable default configurations.
a2dissite default-ssl.conf
a2dissite default-ssl.conf

To apply new configuration restart Apache2 services.
systemctl restart apache2
systemctl status apache2

To validate it is working fine you can test it from two methods:
- Open website from any of browser (It will through error as we are using self-sign certificate)

Accept the risk this time.
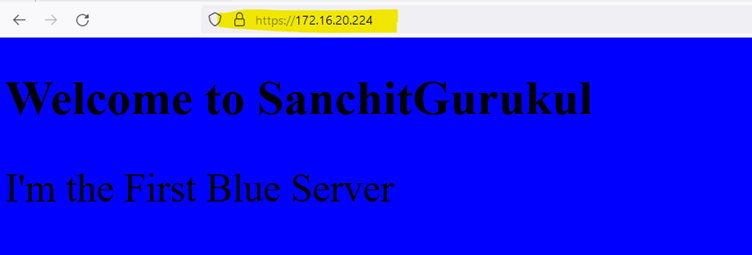
To check certificate details, click on lock icon.

- You can use curl command to validate the site
Please use -k to bypass self-sign certificate warning.
curl -vk https://site _name


Leave a Reply